Follow the below guide to install Nessus offline on your Kali machine.
Step 1: Visit the tenable official website and browse to the Downloads section. Since we are aiming to install Nessus in Kali Linux, so we would download the Linux version, as can be seen in the screenshot below:
URL: https://www.tenable.com/downloads/nessus?loginAttempted=true

Step 2: Once the download finishes, move the installer file from Downloads to /opt/ directory of your Kali installation. Use “dpkg” command to unpack the downloaded Nessus package.

Step 3: After passing all the checks, you should see the screen below prompting you to connect to your installed Nessus through a web browser.

Step 4: Running “ls” command will show you a new folder named Nessus. Open and look for “nessusd” binary.

Step 5: Run the command “service nessusd start”, to start the Nessus service.

Your Kali instance should now be listening on port 8834, which can be verified by running “netstat -antp” command.

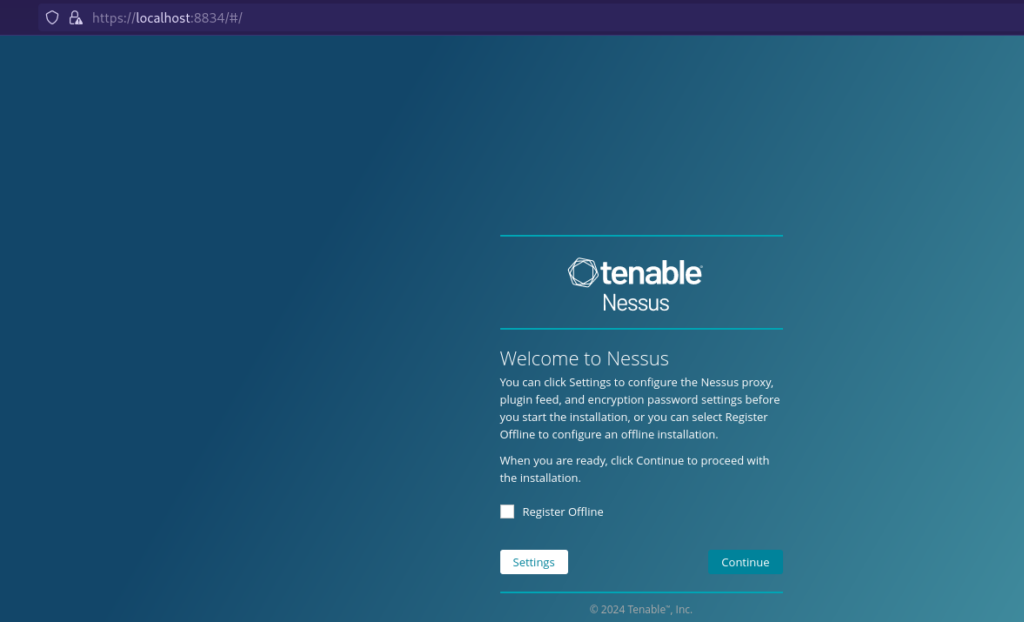
Step 6: Approve the SSL certificate warning in your browser, and you’ll be directed to the welcome page.

Step 7: Select “Register Offline” and click “Continue”. You will then be presented with the options of Nessus that you want to deploy.

Step 8: Choose the type of Tenable Nessus you wish to install: Tenable Nessus Expert, Tenable Nessus Professional, Tenable Nessus Manager, or Managed Scanner. For this demonstration, we will be using Nessus Professional.

Click Continue.
Step 9: From here on, we shall get back to the command prompt for completing a few other necessary preparatory steps:
A. Generate the License
- Using your Kali installation, access the internet and go to the Nessus Offline registration page.
- In the top field, enter the challenge code displayed on the Nessus Product Registration screen. To obtain the challenge code, execute the following command.
# nessuscli fetch –challenge
Example challenge code: aaaaaa11b2222cc33d44e5f6666a777b8cc99884

- Afterwards, enter your Tenable Nessus activation code when asked.

Example activation code: AB-CDE-1111-F222-3E4D-55E5-CD6F
- Click Submit after filling in both fields. We get:
- Custom URL: A Nessus Plugin file for the newest Nessus plugins. Save this URL. A plugin file with the name all-2.0 appears when this custom URL is clicked. tar.g will start to download to your computer. The most recent vulnerability test results will be added to the Nessus plugins database via this file.
- License — It is the entire string of text that begins —–BEGIN Tenable, Inc. LICENSE——— and concludes with —–END Tenable, Inc. Your Nessus product license details are located in LICENSE—–. Tenable verifies your product registration and license using this text string.

B. Copy and Paste the License Text
- Please copy the entire text string that begins with —–BEGIN Tenable, Inc. LICENSE—– and concludes with —–END Tenable, Inc. LICENSE—–.
- Paste the complete text string starting with –—-BEGIN Tenable, Inc. LICENSE—– and ends with —–END Tenable, Inc. LICENSE—–.
- With the License file created inside the Nessus directory, run the command below to update Nessus.
# nessuscli fetch –register-offline <license.file>
On successful execution, you should see the below response

C. Download and Copy the Latest Plugins
- Open the Custom URL (saved during the license generation process).
A compressed TAR file will be downloaded.
- Transfer the compressed TAR file to the Nessus directory.
#mv /home/kali/Downloads/all-2.0.tar.gz /opt/Nessus/sbin/Nessus/
Use the directory as per your operating system:
| Platform | Command |
| Windows | C:\Program Files\Tenable\Nessus |
| macOS | # /Library/Nessus/run/sbin/ |
| Linux | # /opt/nessus/sbin/ |
| FreeBSD | # /usr/local/nessus/sbin/ |
For the Kali installation, execute the command below to update Nessus plugins.
#./nessuscli update all-2.0.tar.gz

The installation process for Tenable Nessus might take a few minutes to complete. Meanwhile, go grab a coffee!
- In the offline installation, we will have to add a user through which we can login to the web interface of Nessus later. To do the same, follow the screenshot below and add your desired user.

- Sign in to the Tenable Nessus web interface using the credentials created during setup.
The Final Step: Having updated Nessus plugins and activating it, you need to restart the Nessus service by executing either of the below command
#./nessus-service start & or ./nessusd start &
Note: Using “&” would background the execution.
This step may take a while as the plugins’ database gets updated with the latest feed.

Launching the Nessus WebUI
Browse to and accept the SSL certificate warning to get to the login screen below.

Now, login with the credentials we created in the previous step through the command line. Finally, you have your Nessus ready to perform a scan.

Caught feelings for cybersecurity? It’s okay, it happens. Follow us on LinkedIn and Instagram to keep the spark alive.


